Admin users have the ability to create and manage multiple user accounts and roles in Vemcount. It's important to assign a user role with a user account to determine the user account permissions.
There is no limit to the number of users or roles that can be created.
Listed below are a number of steps required to create a user account successfully.
Create user account
Create a user account by following the steps below:
- Login to Vemcount using Admin credentials.
- Select the settings 'cog' icon in the top menu.
- Select 'users' menu.
- Select 'add user' to start the create user process.
- Complete the User details section including:
Base Company:
Roles: select a role if already created, otherwise leave blank
Username: best practice is to user the email address
Email:
Full Name:
Timezone: make sure this is correct from a reporting perspective.
Language: English - Select 'Save and go to permissions'.
Set-up user permissions (including company / location data access)
Once a user account is created it is important to set up Vemcount permissions including company and location(s) access. Permissions will determine what information the user can view and the tasks they can perform within Vemcount.
For example:
A user may only be required to view reports.
A company may have 4 separate locations (e.g. stores or sites) and a user may only be required to have access to one of these locations.
See the video below explaining how to set-up user permissions.
Create / assign user roles
Roles assist with managing of multiple user accounts in the Vemcount. When a user account is created it should be assigned a role. Roles determine the levels of permissions (access rights) for each user account. Several roles can be created, however for most organisations, an 'Admin' and 'Regular' user role is sufficient. See table below on role examples.
| User Role |
Permissions |
| Admin |
Access rights to all Vemcount modules including: |
| Regular | Reporting and viewing dashboards. |
| Read only | View dashboards only. |
Create a role by following the steps below:
- Login to Vemcount using Admin credentials.
- Select Setup | Companies in the top menu.
- Select Company to create the role for.
- Select Roles in left side menu.
- Select '+' icon to create a role.
- Name the role, select the users to be included, and assign the access rights/permissions. An explanation of each permission can be viewed here.
- Select 'Save'.
Share relevant dashboards and reports
Existing dashboards and reports can be shared by the Administrator to the newly created user accounts. To learn how to share existing dashboards and saved reports please search Sharing a Report in the Help Center search bar to view this topic.
Connect to and test user's account
Admin users have the ability to 'Assume as a user'. Connecting to a user's account will enable the administrator to see what access and features the user has and check everything has been setup correctly. Follow the steps below:
- Login to Vemcount using Admin credentials.
- Select Setup | Users in the top menu.
- Select the down arrow next to the user account and select 'Assumer as this user'.
- Complete access checks as required, in particular dashboard and reporting.
- Select the crossed out profile icon next to the username in the top menu to exit the user account.
Send Welcome Email to user
Once the Administrator has tested the user account and is satisfied with the setup, a welcome email needs to be sent to the user so the user can nominate a password and log in.
- Login to Vemcount using Admin credentials.
- Select Setup | Users from the top menu.
- Enter the username or user details in the search bar to find the relevant user.
- Select the drop down arrow beside the username of the user account.
- Select 'send welcome email'.
- Select 'send welcome email' button.
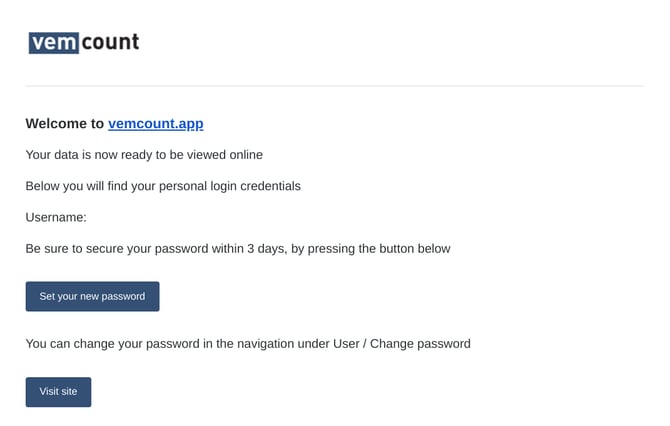
Once the above steps are actioned, a 'Login Details' email will be sent to the email address associated with the user account containing a 'set your password' link. See example below. The user has 3 working days to secure a new password. After 3 days the link will expire.